THE MEASUREMENTS OF WEAR
THE MEASUREMENTS OF WEAR
Wear is the removal of material from one or both of two solid surfaces in relative motion (sliding, rolling, or impact). Wear occurs as a natural consequence and mostly through surface interactions at asperities. Though wear generally refers to material removal, surface damage due to material displacement with no net change in volume or weight is also termed as wear. Wear is a system response; it is not a material property. Interface wear is strongly dominated by operating conditions. Thus the measurement of wear is mainly influenced by the definition of wear that is considered. For the definition of loss of mass, it is possible to measure wear by simply weighing the worn object before and after a wear test. But this does not allow to measure wear if material displaced by wear gets attached to the worn object. Thus there are three basic methods of measuring wear, viz., detection of change in mass, measurement of reduction in the dimension of a worn specimen, and profilometry of the worn object. Measurement of mass change is usually done using a sensitive analytical balance since mass changes in wear are usually small. Reduction in dimensions of the worn object is usually measured by connecting a displacement transducer to the surface of the worn object that is directly above the wear spot. Linear variable differential transformer (LVDT) transducers or noncontact inductive proximity probes along with an electronic amplifier are commonly used. The other commonly used technique for evaluation of the worn volume from the wear scar is profilometry where an optical profile projector or a stylus profilometer or a laser scanning profilometer is used. The optical profile projector is based on projecting an image of the object on a screen and measuring the change in dimensions of the worn specimen. In stylus profilometry, a picture of the wear scar is taken and compiled by using several evenly spaced traverses of the stylus over the scar. Then wear is determined from the deepest wear scar profile. In scanning profilometry, light from a laser is focused on the surface to measure the dimensions of the wear scar. Other specialized techniques for wear measurement are thinlayer activation by radioactivity and ultrasonic interference measurements of dimensional changes. Noise emission and thermal emission from a dynamic contact can also be used for recoding changes in wear condition.
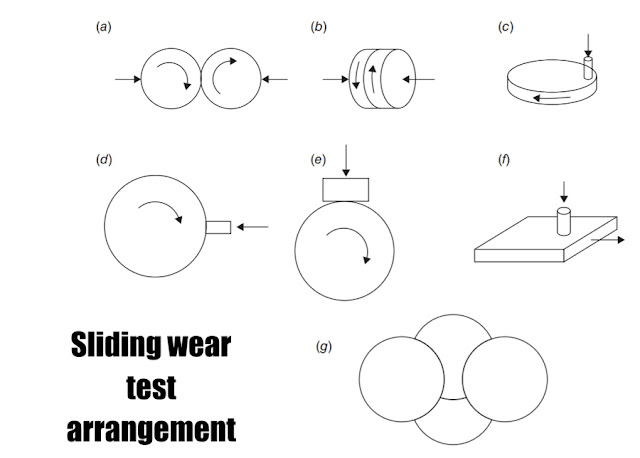
Many different experimental arrangements are used to study sliding wear. These are usually carried out either to examine the process by which wear takes place or to simulate practical situations to generate design data on wear rates and coefficients of friction. Close control and monitoring of all the variables which may influence wear are essential if the results of a test are to be useful for wider scientific purposes. The geometric arrangements in several common types of wear testing apparatus. For adhesive wear between identical materials, the two surfaces are made of the same material. For abrasive wear testing, one of the surfaces, generally the larger one, is made of abrasive material. Changes in geometries and arrangements are done for testing different mechanisms of wear. For two-body abrasive wear, commercial bonded-abrasive paper or cloth is usually used for the counterface, carrying evenly distributed grit particles of narrow size distribution, bonded to the substrate by a strong resin. In simulating three body abrasion, silica (quartz) particles of a narrow size distribution and from a specified source are fed at a constant rate into the contact region. Schematic diagrams of four types of testing methods for erosive wear. In the jet impingement method particles are accelerated in a fluid stream along a nozzle to strike the target material, which is held some distance from the end of the nozzle at a fixed angle. In the recirculating loop test a two phase flow of particles and fluid is driven around a loop of pipe work where the specimen is kept completely immersed in the flow. In the centrifugal accelerator a continuous stream of particles, generated by circular motion of a rotor, strikes the stationary specimens arranged around the rim after the rotor. In the whirling arm rig two specimens at the ends of a balanced rotor move at high speed through a slowly falling stream of particles, striking them at the peripheral speed of the rotor.
MEASUREMENT OF TEST ENVIRONMENT
Many experiments often omit the measurement of environmental factors such as temperature, humidity, and oxygen and lead to apparent conflict in experimental data. Careful measurement and control of these environmental factors are necessary for tribology experiments.


0 comments:
Post a Comment
Please do not enter any spam link in the comment box.